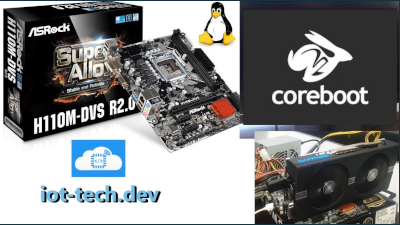
coreboot on ASRock H110M-DVS rev 3.0 and rev 2.0 and me_cleaner
-
david

- Site Admin
- Posts: 423
- Joined: Sat May 21, 2016 7:50 pm
coreboot on ASRock H110M-DVS rev 3.0 and rev 2.0 and me_cleaner
Currently working on trying coreboot on ASRock H110M-DVS rev 3.0
Coreboot from rev2.0 do not work on 3.0 !
I tried to flash directly working rom from 2.0 to 3.0 but did`t work !
Most likely some changes to coreboot need to be made for rev 3.0 to work!
Our telegram group for fast updates!
https://t.me/+h2K5CX5jEZA0MWJk
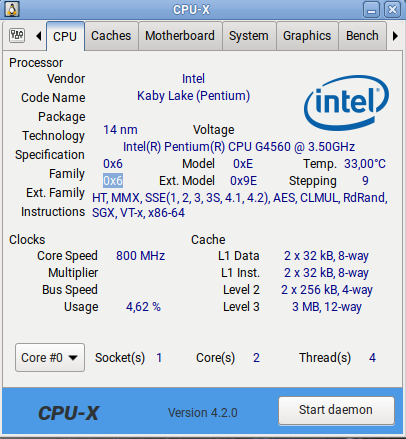
Current test cpu is:
This mini-ITX board shall be able to support up to 9900k with some modification.
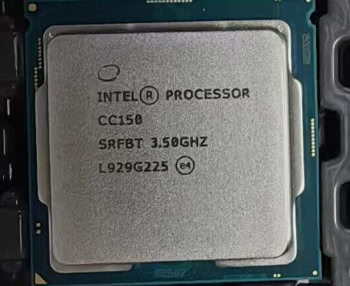
And this intel cc150 cpu has been made specifically for NVIDIA from intel.
(Board not support it stock! we need some additional modification to make it work)!
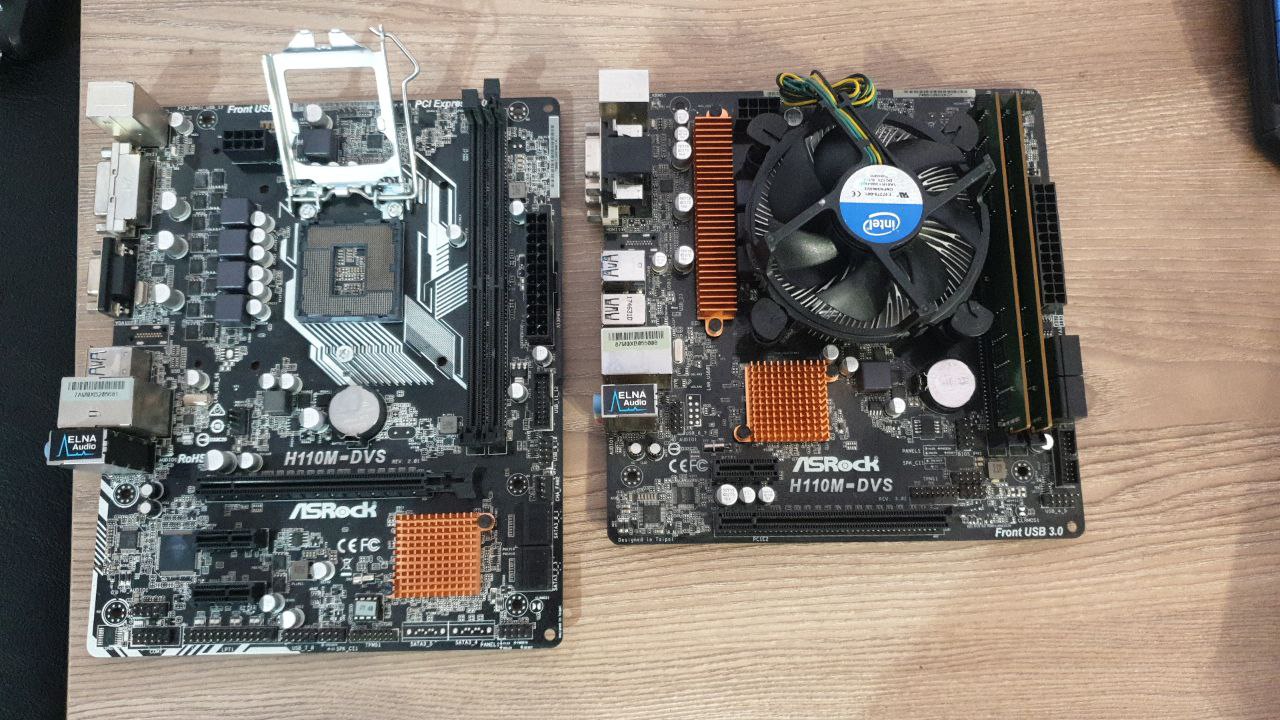
Rev 2.0
Rev 3.0
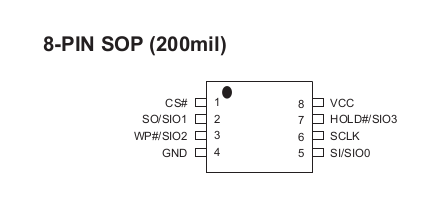
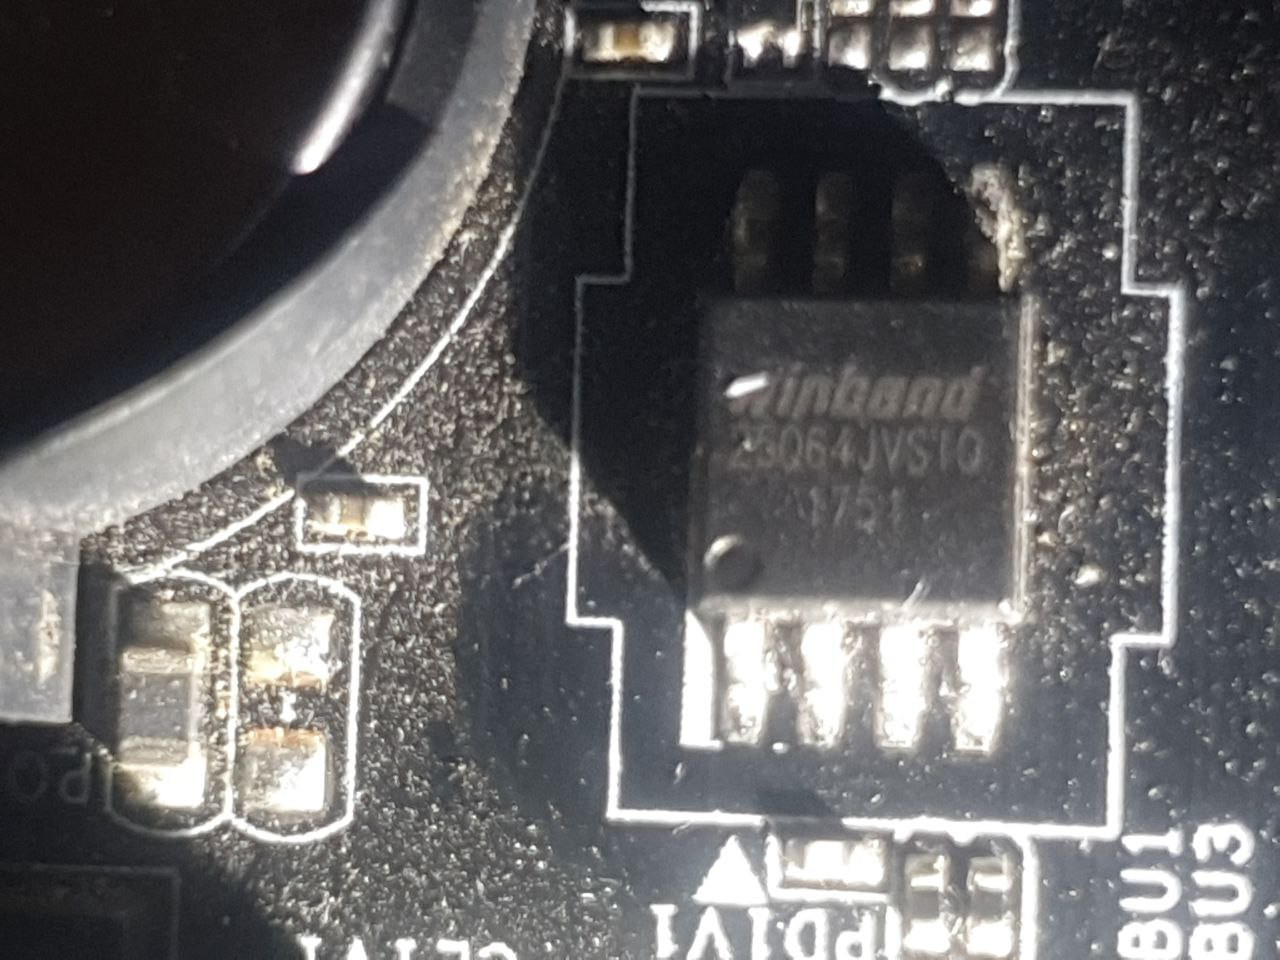
It seems the chip is MX25L6473E for rev 2.0 and for revision 3.0 they use "W25Q64JV-.Q"
PDF:
https://www.iot-tech.dev/fimg/MX25L6475E.PDF
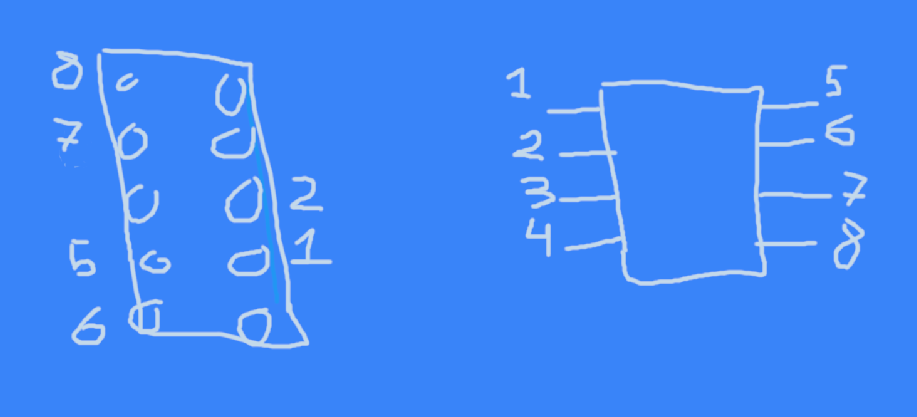
MX25L6473E Pinout (for an 8-pin SOP or WSON package):
Pin 1 (CS#): Chip Select (Active Low)
Pin 2 (SO): Serial Data Output (MISO)
Pin 3 (WP#): Write Protect (can be tied to 3.3V if not used)
Pin 4 (GND): Ground
Pin 5 (SI): Serial Data Input (MOSI)
Pin 6 (SCLK): Serial Clock
Pin 7 (HOLD#): Hold (can be tied to 3.3V if not used)
Pin 8 (VCC): Power Supply (3.3V)
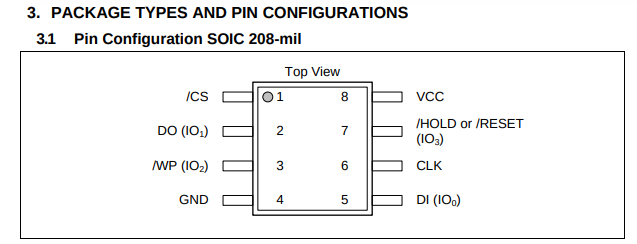
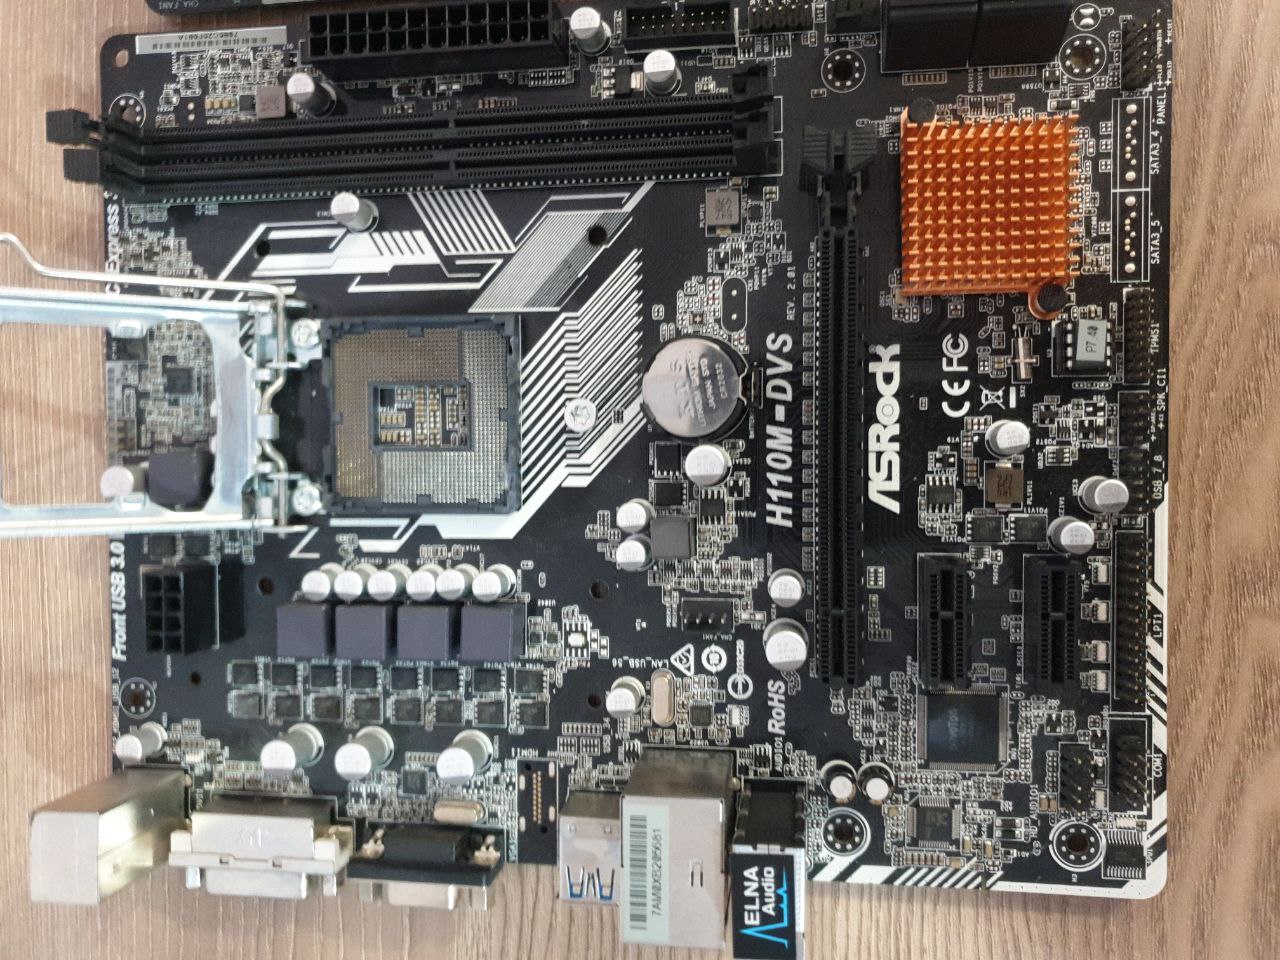
Here is for rev 3.0
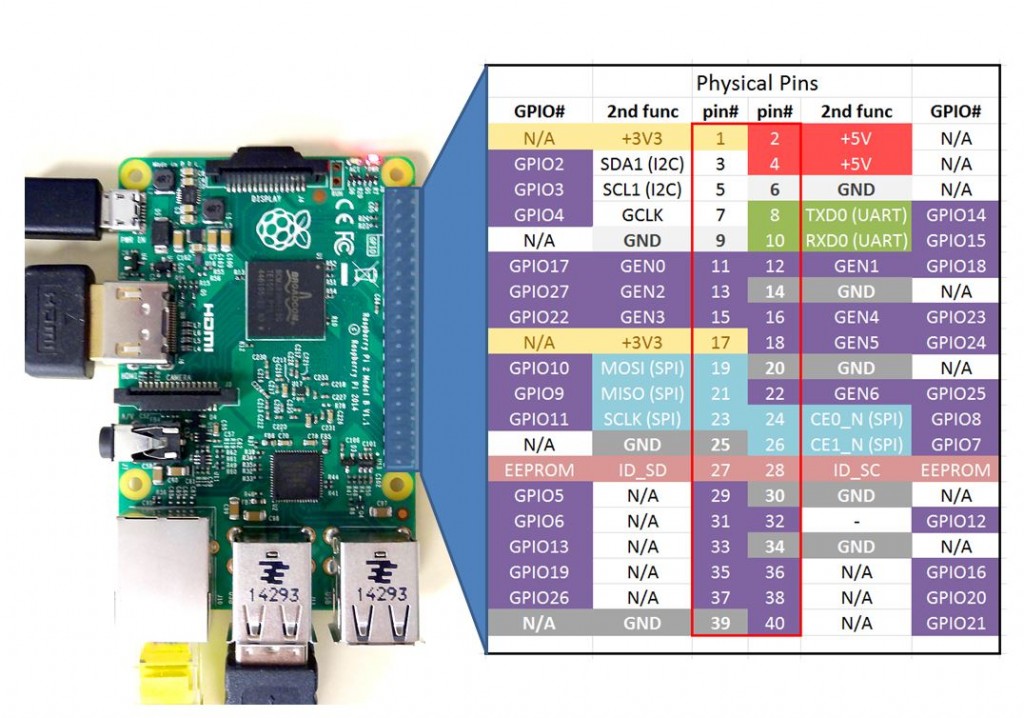
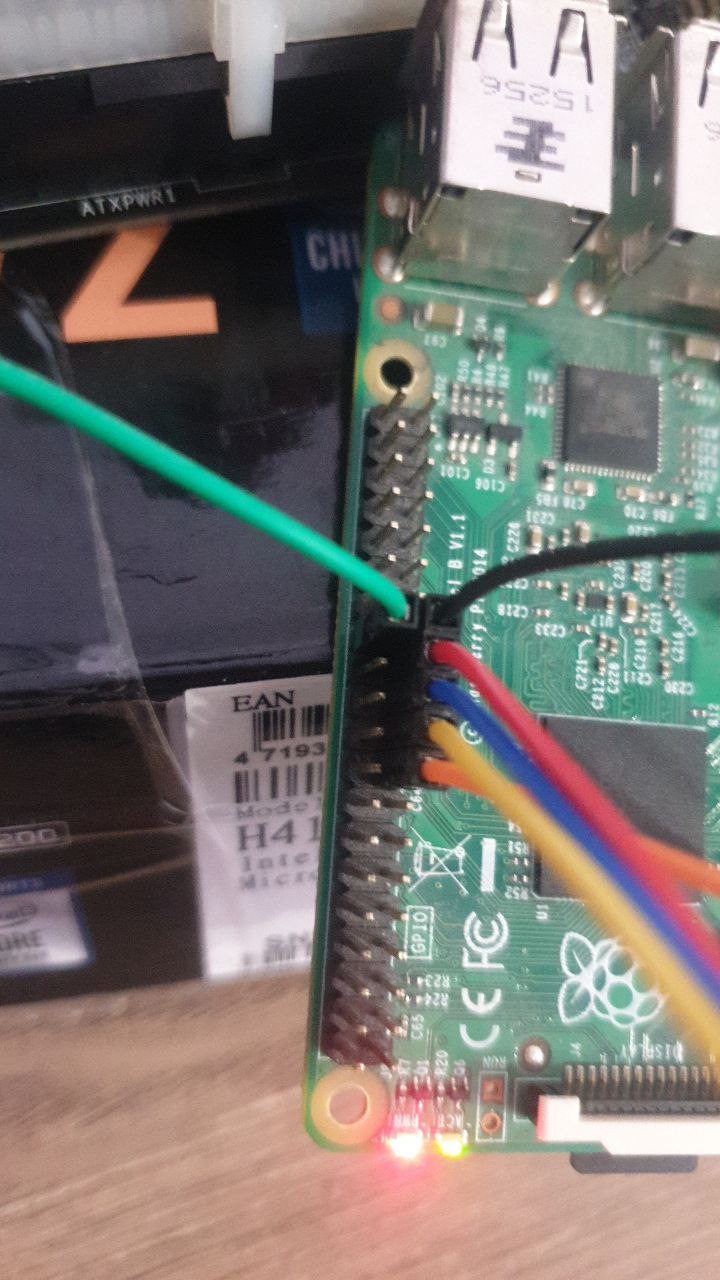
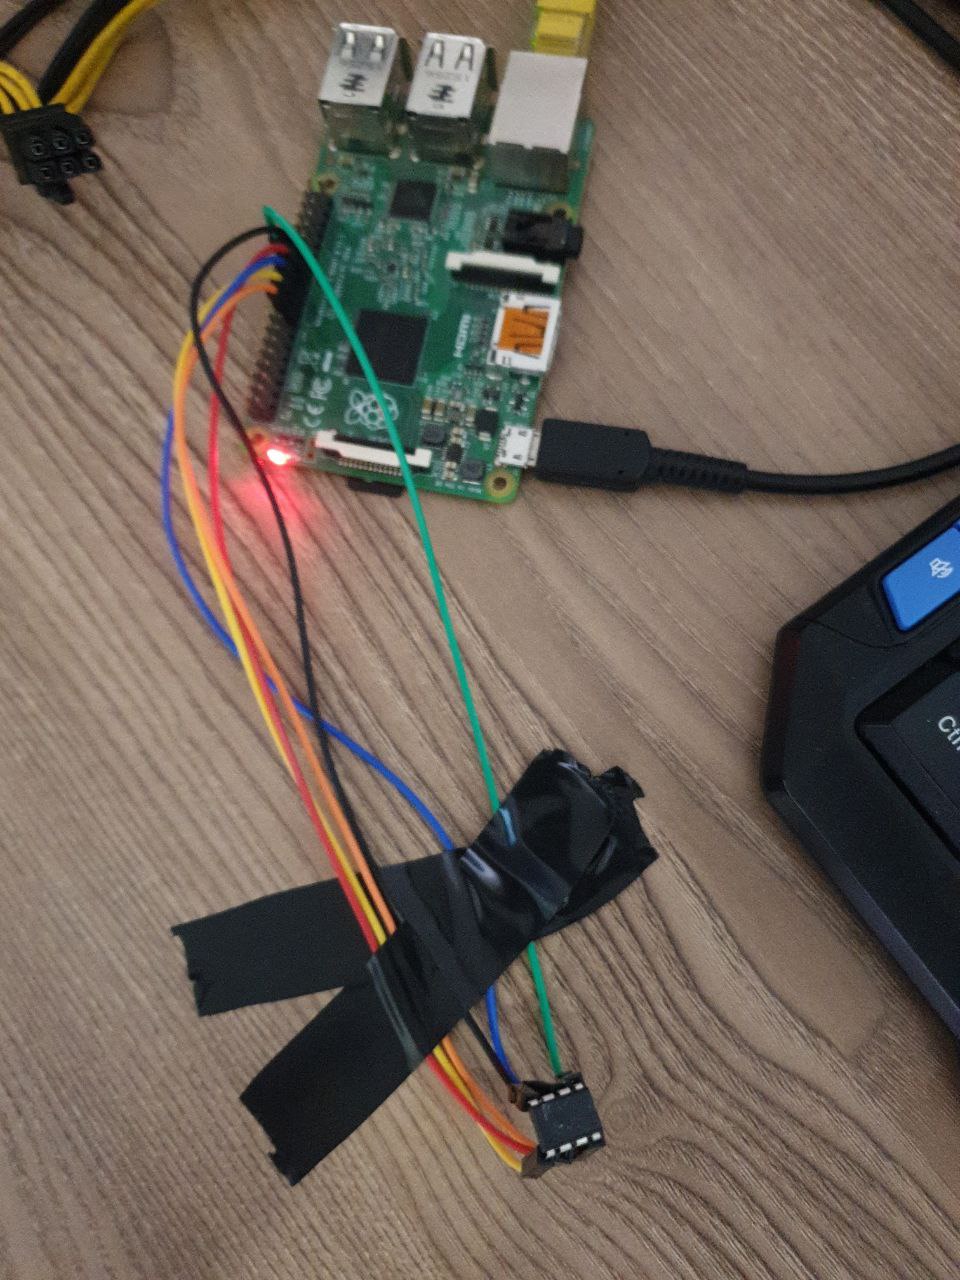
And here how i`m trying to connect it to Pi2 SPI bus for extracting original rom image with ME region!
Raspberry Pi 2 GPIO Pinout (SPI):
Pin 19 yellow (GPIO 10, MOSI): Connect to Pin 5 (SI) of the flash
Pin 21 blue (GPIO 9, MISO): Connect to Pin 2 (SO) of the flash.
Pin 23 red (GPIO 11, SCLK): Connect to Pin 6 (SCLK) of the flash.
Pin 24or26(spi0.0 or spi0.1) green: Connect to Pin 1 (CS#) of the flash.
Pin 25 black (GND): Connect to Pin 4 (GND) of the flash.
Pin 17 orange(3.3V): Connect to Pin 8 (VCC) of the flash.
Optional:
WP# and HOLD# Pins: Tie these to 3.3V (Pin 17) if you're not using them.
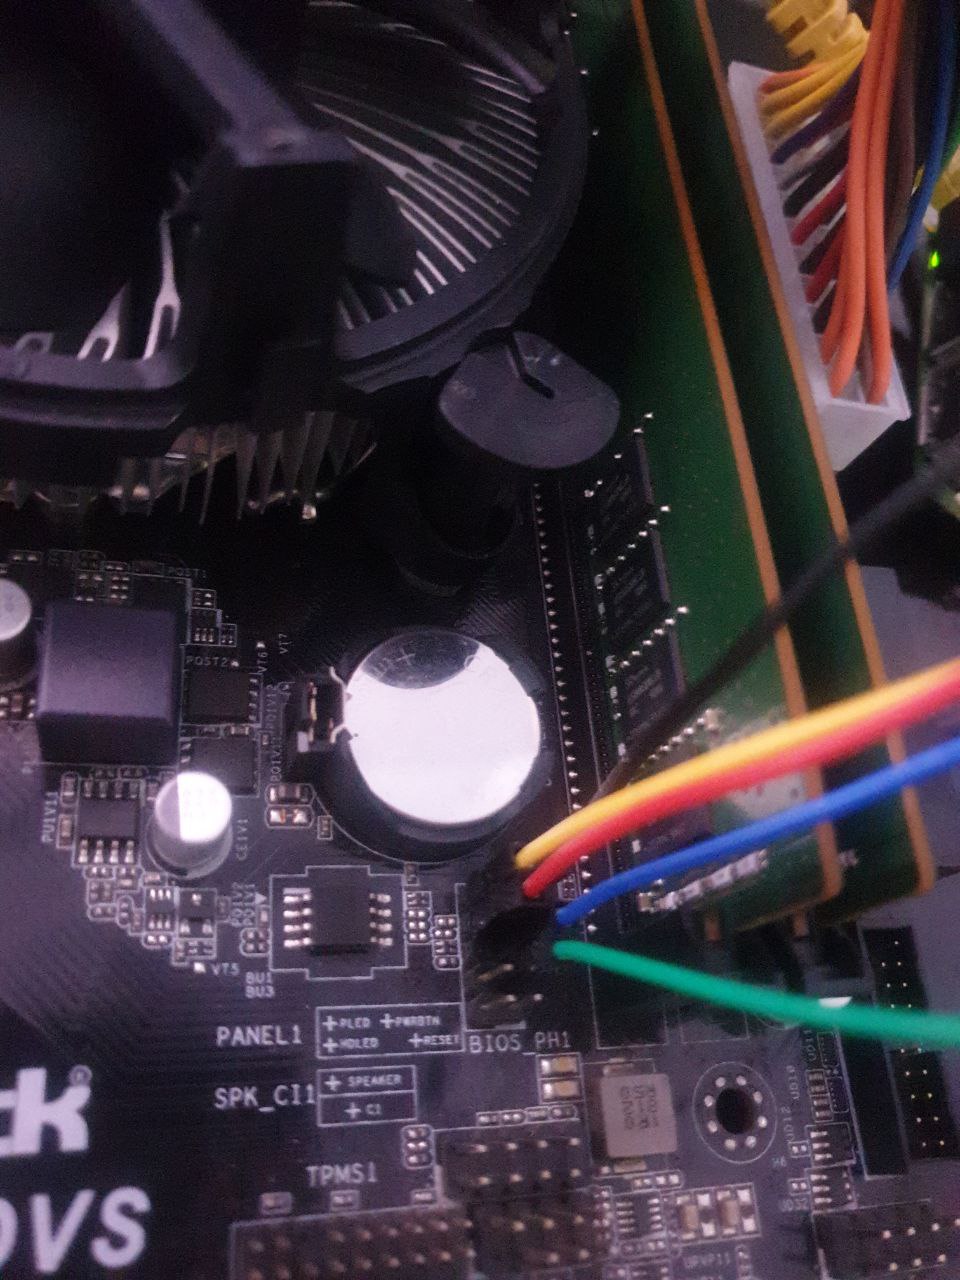
This mainboard has SPI pins out so quick after some digging here is the pin out: (i`m bad painter
  )
)
Reading the firmware is not easy task !
Even you wire everything correctly flashrom will not read it will tell you no flash chip is been found ...
Let me tell you how i did it !
1.Wire everything according to the diagram but do not connect vcc initially, remove the CMOS battery and power off the PSU (power supply)
2.Now connect the vcc pin to raspberry pi for like 5 sec and remove it !
3.Run the read command
Flashrom now will show you that is reading the firmware but when you open the rom file will be empty ! And yes if you connect 3.3V to vcc read will not happend !
So then you will ask how i did it ? Ok here is the solution after you reconnect vcc 3.3V for 5 sec you execute the command and same time turn power on
on the PSU switch then some glitch happening and chip magically unlock for reading and writing !
You can test by yourself that was the only way how we can dump the rom with no desoldering the chip !
Here is original bios from rev 3.0 dump!
https://www.iot-tech.dev/ff/ar/org.rom
Now let remove the ME!
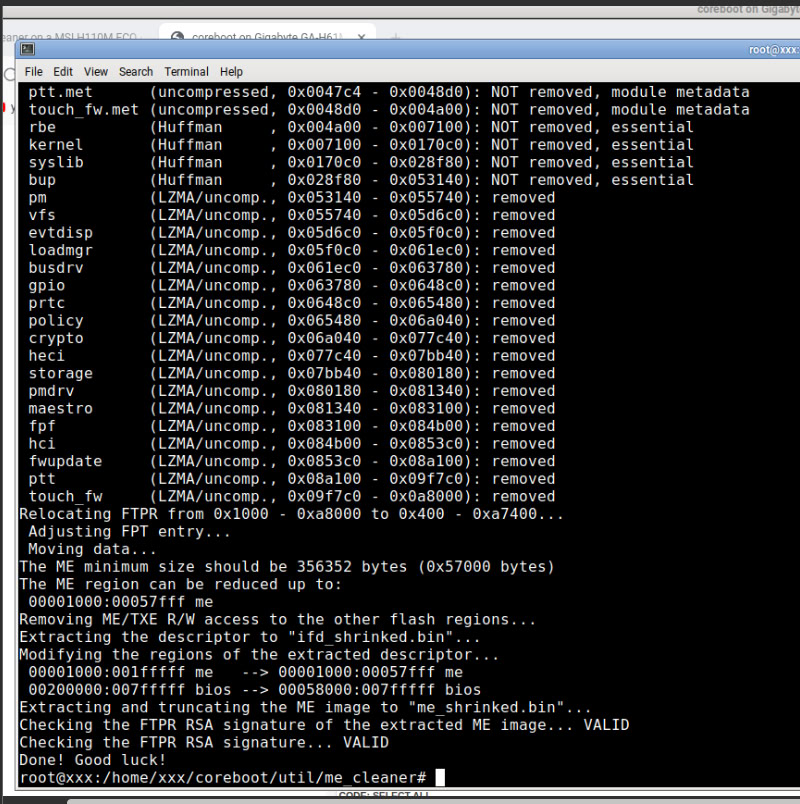
Here is ifd and cleaned me:
https://www.iot-tech.dev/ff/ar/ifd_shrinked.bin
https://www.iot-tech.dev/ff/ar/me_shrinked.bin
Here is Me clean stock original rom!
https://www.iot-tech.dev/ff/ar/mecleanout.bin
Here is Me clean KOFFELAKE PATCHED original rom!
https://www.iot-tech.dev/ff/ar/coffelakepatched.bin
We can flash it and test it now! yep is working ME is gone from pci devices!
Let Build coreboot now !
Update 2:
Rev 2.0 arrived
Dumping the original rom with Pi2
Ok after dumping the bios let see what is inside:
https://www.iot-tech.dev/ff/ar/asrockr2.0.rom
This will extract :
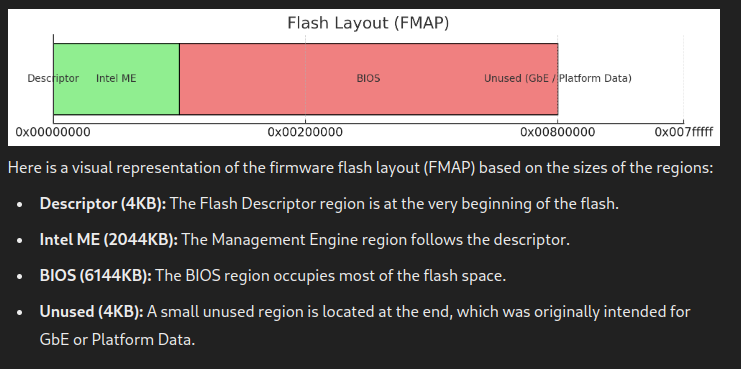
1 - ifd partition (it give info for all regions on the flash)
FLREG0: 0x00000000
Flash Region 0 (Flash Descriptor): 00000000 - 00000fff
Size: 0x00001000 (4KB) --> extracted file --> flashregion_0_flashdescriptor.bin
Download: https://www.iot-tech.dev/ff/ar/flashreg ... riptor.bin
===============================================================
2 - BIOS Region (FLREG1): (bios of the mainboard)
FLREG1: 0x07ff0200
Flash Region 1 (BIOS): 00200000 - 007fffff --> extracted file --> flashregion_1_bios.bin
Size: 0x00600000 (6MB)
===============================================================
3 - Intel ME Region (FLREG2): (intel ME firmware)
FLREG2: 0x01ff0001
Flash Region 2 (Intel ME): 00001000 - 001fffff --> extracted file -->flashregion_2_intel_me.bin
Size: 0x001ff000 (almost 2MB)
Download: https://www.iot-tech.dev/ff/ar/flashreg ... tel_me.bin
Me-Neutralized: https://www.iot-tech.dev/ff/ar/mec.bin
===============================================================
4 - GbE Region (FLREG3): (Unused)
FLREG3: 0x00007fff
Flash Region 3 (GbE): 00fff000 - 00000fff (unused)
===============================================================
5 - Platform Data Region (FLREG4): (Unused)
FLREG4: 0x00007fff
Flash Region 4 (Platform Data): 00fff000 - 00000fff (unused)
Let Build coreboot for Rev 2.0 most likely will work with 3.0 but need to be tested !
To build coreboot we need to set correct Fmap and CBFS size in our case is 0x00600000
Fmap is set by default for this mainboard based on original rom and we need to only add CBFS!
Then we need to add intel descriptor and me firmware !
Note!
If you provide different ifd descriptor than what is on original rom coreboot will build but it will not boot most likely modification of FMAP on coreboot will be needed.
Example:
let say you want to change ifd to make the size of coreboot bios bigger aka CBFS.
Coreboot builds successfully ! i used seabios and EDK2 as payload PS2 keyboard works on both usb not working on sea bios but is working on EDK2.
To download this coreboot rom visit our telegram group !
Our telegram group for fast updates!
https://t.me/+h2K5CX5jEZA0MWJk
======================================================================================================
Resources:
https://github.com/corna/me_cleaner
https://chromium.googlesource.com/chrom ... 10m-dvs.md
https://doc.coreboot.org/mainboard/asro ... m-dvs.html
https://github.com/corna/me_cleaner/wik ... -H110M-ECO
youtu.be/W7nYV8QwwRg
youtu.be/CZADlI-Hge8
Coreboot from rev2.0 do not work on 3.0 !
I tried to flash directly working rom from 2.0 to 3.0 but did`t work !
Most likely some changes to coreboot need to be made for rev 3.0 to work!
Our telegram group for fast updates!
https://t.me/+h2K5CX5jEZA0MWJk
Current test cpu is:
This mini-ITX board shall be able to support up to 9900k with some modification.
And this intel cc150 cpu has been made specifically for NVIDIA from intel.
(Board not support it stock! we need some additional modification to make it work)!
Rev 2.0
Rev 3.0
It seems the chip is MX25L6473E for rev 2.0 and for revision 3.0 they use "W25Q64JV-.Q"
PDF:
https://www.iot-tech.dev/fimg/MX25L6475E.PDF
MX25L6473E Pinout (for an 8-pin SOP or WSON package):
Pin 1 (CS#): Chip Select (Active Low)
Pin 2 (SO): Serial Data Output (MISO)
Pin 3 (WP#): Write Protect (can be tied to 3.3V if not used)
Pin 4 (GND): Ground
Pin 5 (SI): Serial Data Input (MOSI)
Pin 6 (SCLK): Serial Clock
Pin 7 (HOLD#): Hold (can be tied to 3.3V if not used)
Pin 8 (VCC): Power Supply (3.3V)
Here is for rev 3.0
And here how i`m trying to connect it to Pi2 SPI bus for extracting original rom image with ME region!
Raspberry Pi 2 GPIO Pinout (SPI):
Pin 19 yellow (GPIO 10, MOSI): Connect to Pin 5 (SI) of the flash
Pin 21 blue (GPIO 9, MISO): Connect to Pin 2 (SO) of the flash.
Pin 23 red (GPIO 11, SCLK): Connect to Pin 6 (SCLK) of the flash.
Pin 24or26(spi0.0 or spi0.1) green: Connect to Pin 1 (CS#) of the flash.
Pin 25 black (GND): Connect to Pin 4 (GND) of the flash.
Pin 17 orange(3.3V): Connect to Pin 8 (VCC) of the flash.
Optional:
WP# and HOLD# Pins: Tie these to 3.3V (Pin 17) if you're not using them.
This mainboard has SPI pins out so quick after some digging here is the pin out:
Reading the firmware is not easy task !
Even you wire everything correctly flashrom will not read it will tell you no flash chip is been found ...
Let me tell you how i did it !
1.Wire everything according to the diagram but do not connect vcc initially, remove the CMOS battery and power off the PSU (power supply)
2.Now connect the vcc pin to raspberry pi for like 5 sec and remove it !
3.Run the read command
Code: Select all
flashrom -p linux_spi:dev=/dev/spidev0.1,spispeed=8000 -c "W25Q64JV-.Q" -r original.rom
So then you will ask how i did it ? Ok here is the solution after you reconnect vcc 3.3V for 5 sec you execute the command and same time turn power on
on the PSU switch then some glitch happening and chip magically unlock for reading and writing !
You can test by yourself that was the only way how we can dump the rom with no desoldering the chip !
Here is original bios from rev 3.0 dump!
https://www.iot-tech.dev/ff/ar/org.rom
Now let remove the ME!
Code: Select all
python me_cleaner.py -r -t -d -O mecleanout.bin -D ifd_shrinked.bin -M me_shrinked.bin /home/user/org.romHere is ifd and cleaned me:
https://www.iot-tech.dev/ff/ar/ifd_shrinked.bin
https://www.iot-tech.dev/ff/ar/me_shrinked.bin
Here is Me clean stock original rom!
https://www.iot-tech.dev/ff/ar/mecleanout.bin
Here is Me clean KOFFELAKE PATCHED original rom!
https://www.iot-tech.dev/ff/ar/coffelakepatched.bin
We can flash it and test it now! yep is working ME is gone from pci devices!
Code: Select all
flashrom -p linux_spi:dev=/dev/spidev0.1,spispeed=8000 -c "W25Q64JV-.Q" -w mecleanout.binLet Build coreboot now !
Update 2:
Rev 2.0 arrived
Dumping the original rom with Pi2
Ok after dumping the bios let see what is inside:
https://www.iot-tech.dev/ff/ar/asrockr2.0.rom
Code: Select all
ifdtool -x original_bios.bin

ifdtool -d flashregion_0_flashdescriptor.bin
This will extract :
1 - ifd partition (it give info for all regions on the flash)
FLREG0: 0x00000000
Flash Region 0 (Flash Descriptor): 00000000 - 00000fff
Size: 0x00001000 (4KB) --> extracted file --> flashregion_0_flashdescriptor.bin
Download: https://www.iot-tech.dev/ff/ar/flashreg ... riptor.bin
===============================================================
2 - BIOS Region (FLREG1): (bios of the mainboard)
FLREG1: 0x07ff0200
Flash Region 1 (BIOS): 00200000 - 007fffff --> extracted file --> flashregion_1_bios.bin
Size: 0x00600000 (6MB)
===============================================================
3 - Intel ME Region (FLREG2): (intel ME firmware)
FLREG2: 0x01ff0001
Flash Region 2 (Intel ME): 00001000 - 001fffff --> extracted file -->flashregion_2_intel_me.bin
Size: 0x001ff000 (almost 2MB)
Download: https://www.iot-tech.dev/ff/ar/flashreg ... tel_me.bin
Me-Neutralized: https://www.iot-tech.dev/ff/ar/mec.bin
===============================================================
4 - GbE Region (FLREG3): (Unused)
FLREG3: 0x00007fff
Flash Region 3 (GbE): 00fff000 - 00000fff (unused)
===============================================================
5 - Platform Data Region (FLREG4): (Unused)
FLREG4: 0x00007fff
Flash Region 4 (Platform Data): 00fff000 - 00000fff (unused)
Let Build coreboot for Rev 2.0 most likely will work with 3.0 but need to be tested !
To build coreboot we need to set correct Fmap and CBFS size in our case is 0x00600000
Fmap is set by default for this mainboard based on original rom and we need to only add CBFS!
Then we need to add intel descriptor and me firmware !
Note!
If you provide different ifd descriptor than what is on original rom coreboot will build but it will not boot most likely modification of FMAP on coreboot will be needed.
Example:
let say you want to change ifd to make the size of coreboot bios bigger aka CBFS.
Coreboot builds successfully ! i used seabios and EDK2 as payload PS2 keyboard works on both usb not working on sea bios but is working on EDK2.
To download this coreboot rom visit our telegram group !
Our telegram group for fast updates!
https://t.me/+h2K5CX5jEZA0MWJk
======================================================================================================
Resources:
https://github.com/corna/me_cleaner
https://chromium.googlesource.com/chrom ... 10m-dvs.md
https://doc.coreboot.org/mainboard/asro ... m-dvs.html
https://github.com/corna/me_cleaner/wik ... -H110M-ECO
youtu.be/W7nYV8QwwRg
youtu.be/CZADlI-Hge8
-
david
- Site Admin
- Posts: 423
- Joined: Sat May 21, 2016 7:50 pm
Re: coreboot on ASRock H110M-DVS rev 3.0 and rev 2.0 and me_cleaner
Main me_cleaner Options:
Hint!
me_cleaner.py versions are different so some parameters from github page is not matching coreboot version !
There is many versions including forks of me_cleaner.py so some of them can work only on flashregion_2_intel_me.bin some require full-flash-dump!
1. -s or --soft-disable:
-S capital S option will not only put HAP bit but also will delete ME modules
Purpose: This option disables the ME without removing it entirely. It attempts to set the HAP (High Assurance Platform) bit and leave the firmware mostly intact.Use Case: When you want to disable the ME but retain as much compatibility as possible with the existing firmware.
2. -r or --remove:
Purpose: This option strips down the ME firmware by removing most of its modules, reducing it to a minimal stub. The removed portions of the ME are replaced with padding (usually 0xFF).
Use Case: When you want to reduce the ME's functionality to the bare minimum required for system boot.
3. -d or --disable:
Purpose: This option attempts to disable the ME by setting specific fields and registers, similar to the soft-disable method but more aggressively.
Use Case: When the soft-disable option alone doesn’t work, this option may help.
4. -t or --truncate:
Purpose: This option reduces the size of the ME region by truncating unused sections. It’s used when you want to free up space in the firmware for other purposes.Use Case: When you need more space for Coreboot or other payloads and are okay with potentially losing some ME functionality.
Hint!
me_cleaner.py versions are different so some parameters from github page is not matching coreboot version !
There is many versions including forks of me_cleaner.py so some of them can work only on flashregion_2_intel_me.bin some require full-flash-dump!
1. -s or --soft-disable:
-S capital S option will not only put HAP bit but also will delete ME modules
Code: Select all
python3 me_cleaner.py -s flashdump.bin 2. -r or --remove:
Purpose: This option strips down the ME firmware by removing most of its modules, reducing it to a minimal stub. The removed portions of the ME are replaced with padding (usually 0xFF).
Use Case: When you want to reduce the ME's functionality to the bare minimum required for system boot.
Code: Select all
python3 me_cleaner.py -r flashdump.bin
3. -d or --disable:
Purpose: This option attempts to disable the ME by setting specific fields and registers, similar to the soft-disable method but more aggressively.
Use Case: When the soft-disable option alone doesn’t work, this option may help.
Code: Select all
python3 me_cleaner.py -d flashregion_2_intel_me.bin4. -t or --truncate:
Purpose: This option reduces the size of the ME region by truncating unused sections. It’s used when you want to free up space in the firmware for other purposes.Use Case: When you need more space for Coreboot or other payloads and are okay with potentially losing some ME functionality.
Code: Select all
python3 me_cleaner.py -t flashregion_2_intel_me.bin
-
david
- Site Admin
- Posts: 423
- Joined: Sat May 21, 2016 7:50 pm
Re: coreboot on ASRock H110M-DVS rev 3.0 and rev 2.0 and me_cleaner
There are a few approaches and tools that might help you in modifying or analyzing the ME firmware:
1. Intel FIT (Flash Image Tool)
Purpose: Intel FIT is the official tool provided by Intel for building and modifying firmware images, including the ME region.
Usage: You can use Intel FIT to open the full firmware image, view and configure ME settings, and potentially modify or disable certain ME features.
Compatibility: This tool is specifically designed for Intel platforms, making it the most reliable option for handling ME firmware.
2. ME Analyzer
Purpose: ME Analyzer, part of the Intel ME System Tools, is designed to analyze the ME firmware version, SKU, and other details.
Usage: It's used primarily for identifying the ME firmware version and ensuring that modifications or extractions are done correctly.
Limitations: ME Analyzer is not a modification tool but is crucial for understanding what version of the ME firmware you're working with.
3. HackingTeam’s CSME Tools
Purpose: HackingTeam developed some tools that allow for more advanced manipulation of the CSME firmware, but these are not openly available and are quite complex.
Neutralizing Intel ME via internal flashing with Intel FPT.
https://github.com/mostav02/Remove_Inte ... ng-via-fpt
Flashing ME only part:
Code: Select all
flashrom -p <programmer> -w me_firmware.bin --ifd -i me
-
walterav
- Posts: 52
- Joined: Sat Sep 07, 2024 7:08 pm
Re: coreboot on ASRock H110M-DVS rev 3.0 and rev 2.0 and me_cleaner
Success when flashing your original H110M-DVS rev 2.0 "asrockr2.0.rom" (after it was modified by myself with me_cleaner with -S option) on a Asrock H110 Pro BTC+ with a Xeon e3-1270-v6. It has the same flaw as the original Pro BTC+ BIOS( with me_cleaner), that it will only boot a single time on coldboots with the Xeon CPU. Geekbench performance between the different BIOS is the same.
Only the ethernet is missing since the Pro BTC+ uses an onboard intel Nic instead of a Realtek Nic when using the DVS rev 2 BIOS. GPU in 16x slot is also working and detected and 2 other pci slots are also detected in BIOS. Linux detects the PCI-MUX switch chip which may give access to all the other pci-e X1 slots...
The Pro BTC+ uses the same Nuvoton nct6791D as your DVS, I can confirm COM1 serial header is working and PS2 keyboard&mouse which may become usefull when debugging Coreboot Seabios/ed2k....
Could you share your Coreboot Rev2 image for your DVS (pm), so I could try to flash that one on my H110 Pro BTC+? I do need to have the kabylake microcode in it, which was already in the original Asrock BIOS, the ME does need to be disabled otherwise it won't boot with this unofficial Xeon server CPU.
If coreboot works I might try to compile my own version.
-
david
- Site Admin
- Posts: 423
- Joined: Sat May 21, 2016 7:50 pm
Re: coreboot on ASRock H110M-DVS rev 3.0 and rev 2.0 and me_cleaner
Yes i can give you the link to download it.
I`m very curious too is this coreboot will work on your mainboard you can come to my Telegram channel too and we can chat there:
https://t.me/+h2K5CX5jEZA0MWJk
https://www.iot-tech.dev/ff/ar/coreboot ... meclen.rom
Seabios rom use with external GPU integrated gpu is not disabled only will not show on boot screen as i not added integrated gpu vga rom.
Seabios works with nvidia 730 , and RX 580 GPU. i tested them.
P.S coreboot is build with 6 , 7 and 8 gen CPU support maybe 9 gen will also work but for this 8 and 9 gen cpu`s need to be modded for 6 and 7 gen no modification on the cpu is needed so you can test your xeon i think will have no problem booting and working normally if the coreboot version will work on this mainboard xeon cpu shall be no problem in coreboot.
-
walterav
- Posts: 52
- Joined: Sat Sep 07, 2024 7:08 pm
Re: coreboot on ASRock H110M-DVS rev 3.0 and rev 2.0 and me_cleaner
Thanks for the coreboot image, sadly it didn't work.
The power-on behaviour was the same like a normal bios with active ME and a unsupported CPU.
It powers on for a second, than powers off again no activity on serial port, just a short fan spin.
Doing some digging in the ROM file I found about 630Kb of CPU microcode, also the FSP package might give us options https://github.com/coreboot/fsp. Did you add theAmberlakeFspBinPkg v2.1 for late kabylake or the KabylakeFspBinPkg v2.0, also read somewhere that coreboot build suggest some 3.0 package?
Will try to acquire an extra board with normal supported CPU, will let you know if that works.
BTW where you able to get a coffeelake CPU working with the Coreboot bios, or even with the normal Bios?
-
david
- Site Admin
- Posts: 423
- Joined: Sat May 21, 2016 7:50 pm
Re: coreboot on ASRock H110M-DVS rev 3.0 and rev 2.0 and me_cleaner
The coreboot rom also not working on rev 3.0 of this board only work on rev 2.0.
Sky Lake, Kaby Lake and Coffe Lake options was enable in coreboot and i did tested with G4560 and Intel® Core™ i5-7500 only this two cpu`s i had for now both Kaby Lake both worked perfectly.
Soon i will test 9700T and this CC150 both 9 gen coffe lake.
https://ark.intel.com/content/www/us/en ... 0-ghz.html
https://www.intel.com/content/www/us/en ... tions.html
P.S one think i remember now there were option use FSP to initialize the MP on the cpu i can try to build rom using this option and you can test with this one also.
So i build new rom with this option if you wana try it here is it.
https://www.iot-tech.dev/ff/seabiosMPFSP.rom
-
walterav
- Posts: 52
- Joined: Sat Sep 07, 2024 7:08 pm
Re: coreboot on ASRock H110M-DVS rev 3.0 and rev 2.0 and me_cleaner
Good news!
Your H110M-DVS rev.2 coreboot.rom with sha256 below posts & boots and runs Fedora live from USB 2.0 on a Asrock H110-Pro-BTC+ rev1.02 board (alternating white/black colored pci1x slots) with a Kabylake G3950 CPU and a single 8GB DIMM in first slot labeled DDR4_A1!
sha256sum
https://www.iot-tech.dev/ff/ar/coreboot ... meclen.rom
1a62eba5676a9dbbb0e40ad4a9f35ad852d4e301c90dd3c639d0480479a519e4
CPU Fan works
CPU sensors read TEMP
8GB DIMM detected
PS2 keyboard is also working, PS2 mouse isn't!
intel Gbit nic is not detected
Serial Port COM1 isn't working neither coreboot/seabios/OS
cold/warm (re)boot and shutdown all working
Like you mentioned there is no seaBIOS/Corebios payload post screen with onboard graphics but as soon as kernel load picture appears on DVI output.
TESTING:
Next will try 16X PCIE slot with AMDGPU and see if length is also 16X and speed is pcie3.0 and 8GT.
Change CPU to Skylake celeron G4400 and i3 6100T.
Change CPU to E3-1270-v6
-
david
- Site Admin
- Posts: 423
- Joined: Sat May 21, 2016 7:50 pm
Re: coreboot on ASRock H110M-DVS rev 3.0 and rev 2.0 and me_cleaner
walterav wrote: ↑Sat Sep 14, 2024 10:40 am Good news!
Your H110M-DVS rev.2 coreboot.rom with sha256 below posts & boots and runs Fedora live from USB 2.0 on a Asrock H110-Pro-BTC+ rev1.02 board (alternating white/black colored pci1x slots) with a Kabylake G3950 CPU and a single 8GB DIMM in first slot labeled DDR4_A1!
sha256sum
https://www.iot-tech.dev/ff/ar/coreboot ... meclen.rom
1a62eba5676a9dbbb0e40ad4a9f35ad852d4e301c90dd3c639d0480479a519e4
CPU Fan works
CPU sensors read TEMP
8GB DIMM detected
PS2 keyboard is also working, PS2 mouse isn't!
intel Gbit nic is not detected
Serial Port COM1 isn't working neither coreboot/seabios/OS
cold/warm (re)boot and shutdown all working
Like you mentioned there is no seaBIOS/Corebios payload post screen with onboard graphics but as soon as kernel load picture appears on DVI output.
TESTING:
Next will try 16X PCIE slot with AMDGPU and see if length is also 16X and speed is pcie3.0 and 8GT.
Change CPU to Skylake celeron G4400 and i3 6100T.
Change CPU to E3-1270-v6
Nice !!! Good job ! I will buy this mainboard to test also is way easy to be found.
Is only one dimm for ram works ? i did tested with 2x8GB Hynix 2666 Ram and was working good on my asrock r2.0 board.
-
walterav
- Posts: 52
- Joined: Sat Sep 07, 2024 7:08 pm
Re: coreboot on ASRock H110M-DVS rev 3.0 and rev 2.0 and me_cleaner
Testing H110M-DVS rev.2 coreboot.rom on Asrock H110-Pro-BTC+ rev1.02:
FANS:
-all CHA/CPU _FAN ports keeps fan spinning but not sensor readout of FAN SPEED in linux
PCIE 1x 3.0 16X GPU SLOT
-AMD GPU (old radeon) 9xxx GPU won't post nor boot at all (maybe not enough PCIE power to motherboard... see R9 360)
-Nvidia GTX640 (modified VBIOS EFI64mod) works, no coreboot nor seaBIOS screen, no grub from USB, but blinking cursor before booting linux visable!
linux shows 16x link width is in use, but link speed 2,5GT downgraded probably governor/throttle...(works without extra power to motherboard)
-AMDGPU r9 360, works shows, SeaBIOS, shows USB grub2 bootscreen, shows 8GT link speed and 16X link width!!! (NEEDED MOLEX PCIE1 power to motherboard)
PCIE 1x 2.0 slot above GPU
-Works with realtek 2,5GB NIC, detected as 5.0GT at 1X speed
RAM:
All single or combinations of DIMMS using the second slot DDR4_B1 will fail to POST, systems power on all fans spin but poweroff button won't work!
DDR4 4GB DIMM 2166 works ok only in DDR4_A1 slot.
Testing
CPU swap... skylake celeron G4400 WORKS, iGPU also works after kernel boot
CPU swap... kabylake E3-1270-v6 DOESN'T WORK, (powers on and off immediately only short fan spin...)
CPU i3 6100T (available soon)
PS2 keyboard doesn't work at Grub2 bootscreen, while USB does.
SeaBIOS shows press ESC but doesn't work on USB nor PS2 keyboard.
Does Coreboot/SeaBIOS/OS Serial Port work on your board? Tried in linux ttyS0-S3 115200 8N hardware flow(enabled/disabled)?