Orange Pi one Armbian Mod 2 GPIO control
-
david

- Site Admin
- Posts: 422
- Joined: Sat May 21, 2016 7:50 pm
Orange Pi one Armbian Mod 2 GPIO control
Join our telegram group if you wana chat or have specific questions:
https://t.me/+h2K5CX5jEZA0MWJk
How to control GPIO on Orange Pi one using Armbian Mod 2
Ambian mod 2 links for download will be available in our Telegram Group:
https://t.me/+h2K5CX5jEZA0MWJk
1. To control the GPIO pins on the Orange Pi One, we can use the SysFS interface provided by the Linux kernel. Here's an example of GPIO control using the SysFS interface:
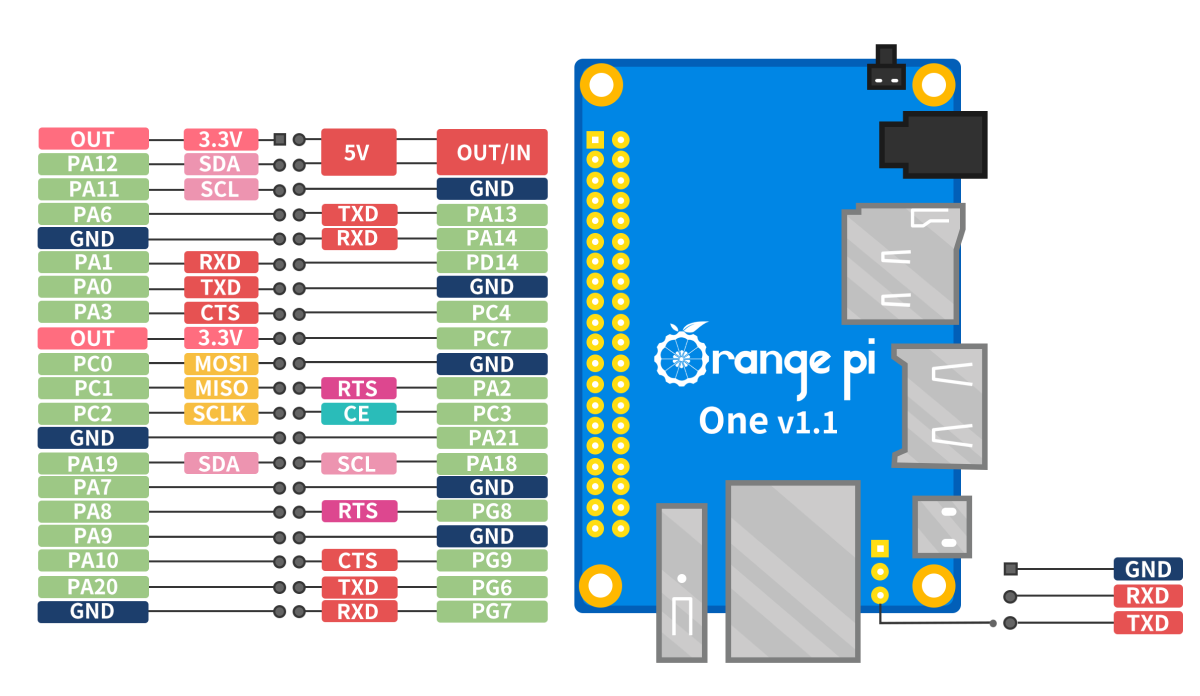
This example use :GPIO pin PA3
Copy the code to blink.c file and compile with this command.
Run blink file as root:
2.Second method is using Wiring Pi lib that use Arduino like C code to control GPIO pins:
Download and install Wiring Pi for Orange Pi.
How to build wiringOP
Now from terminal:
You are sending command "1" "turn on" or "0" turn off !
It use same pin as previous example PA3
3.How to Create C program example for controlling GPIO using Wiring Pi.
Creare file blink.c and copy this code into the file!
Compile and run the blink program!
https://t.me/+h2K5CX5jEZA0MWJk
How to control GPIO on Orange Pi one using Armbian Mod 2
Ambian mod 2 links for download will be available in our Telegram Group:
https://t.me/+h2K5CX5jEZA0MWJk
1. To control the GPIO pins on the Orange Pi One, we can use the SysFS interface provided by the Linux kernel. Here's an example of GPIO control using the SysFS interface:
This example use :GPIO pin PA3
Code: Select all
#include <stdio.h>
#include <stdlib.h>
#include <fcntl.h>
#include <unistd.h>
#include <string.h>

#define GPIO_PIN        3    // GPIO pin number for the LED (PA3)

int main(void) {
    int fd;
    char buf[64];

    // Open the GPIO value file for writing
    if ((fd = open("/sys/class/gpio/export", O_WRONLY)) < 0) {
        printf("Failed to open GPIO export.\n");
        return 1;
    }

    // Export the desired GPIO pin
    snprintf(buf, sizeof(buf), "%d", GPIO_PIN);
    write(fd, buf, strlen(buf));
    close(fd);

    // Open the direction file for writing
    snprintf(buf, sizeof(buf), "/sys/class/gpio/gpio%d/direction", GPIO_PIN);
    if ((fd = open(buf, O_WRONLY)) < 0) {
        printf("Failed to open GPIO direction.\n");
        return 1;
    }

    // Set the pin as output
    write(fd, "out", 3);
    close(fd);

    // Open the value file for writing
    snprintf(buf, sizeof(buf), "/sys/class/gpio/gpio%d/value", GPIO_PIN);
    if ((fd = open(buf, O_WRONLY)) < 0) {
        printf("Failed to open GPIO value.\n");
        return 1;
    }

    while (1) {
        // Turn on the LED
        write(fd, "1", 1);
        usleep(1000000);  // Delay for 1 second

        // Turn off the LED
        write(fd, "0", 1);
        usleep(1000000);  // Delay for 1 second
    }

    // Close the GPIO value file
    close(fd);

    // Open the GPIO unexport file for writing
    if ((fd = open("/sys/class/gpio/unexport", O_WRONLY)) < 0) {
        printf("Failed to open GPIO unexport.\n");
        return 1;
    }

    // Unexport the GPIO pin
    snprintf(buf, sizeof(buf), "%d", GPIO_PIN);
    write(fd, buf, strlen(buf));
    close(fd);

    return 0;
}
Code: Select all
g++ blink.c -o blinkCode: Select all
./blinkDownload and install Wiring Pi for Orange Pi.
Code: Select all
# apt-get update
# apt-get install -y git
# git clone https://github.com/orangepi-xunlong/wiringOP.gitCode: Select all
# cd wiringOP
# ./build clean
# ./build Code: Select all
gpio write 8 1
gpio write 8 0
It use same pin as previous example PA3
3.How to Create C program example for controlling GPIO using Wiring Pi.
Creare file blink.c and copy this code into the file!
Code: Select all
#include <stdio.h>
#include <wiringPi.h>

#define LED 8 // GPIO pin number for the LED

int main(void) {

 wiringPiSetup () ;
 pinMode (LED, OUTPUT) ;

    while (1) {
        digitalWrite(LED, HIGH); // Turn on the LED
        delay(1000); // Delay for 1 second
        digitalWrite(LED, LOW); // Turn off the LED
        delay(1000); // Delay for 1 second
    }

    return 0;
}
Code: Select all
g++ blink.c -o blink -lwiringPiCode: Select all
./blink
-
pepeloke
- Posts: 3
- Joined: Mon Jun 05, 2023 12:30 pm
Re: Orange Pi one Armbian Mod 2 GPIO control
I tryed this simple C program it works also with Orange Pi PC ! 